Notes
Create and Print Notes
The Notes field in WBS Schedule Pro can handle a large amount of text and is a great way to add detailed descriptions to the tasks in your project.
There are times when you want to enter extensive descriptions for the tasks in your project but not use the Task Name or Text fields which can only handle a limited amount of data. There is no limit to the amount of text you can enter into the Notes field and WBS Schedule Pro provides several convenient ways to input this information.

Entering Notes
The most convenient way to enter Notes is through the Notes Pane. The Notes Pane initially appears on the left side of the WBS Schedule Pro screen where you can click to enter the Notes. You can also make the Notes pane "float" so that you can click the Tasks in your project to easily enter Notes. Simply drag the Notes tab and place it anywhere on your screen. Click and drag the corners to resize it so it displays the amount of data you need to see.
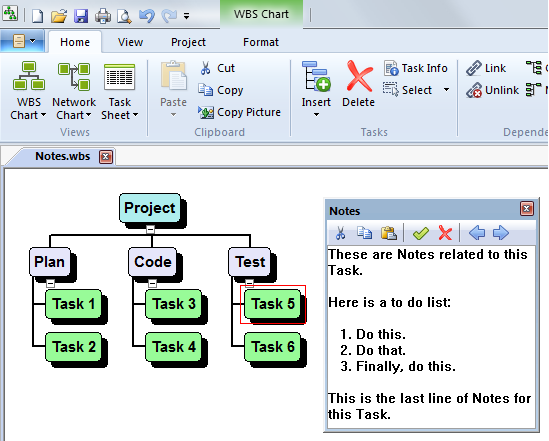
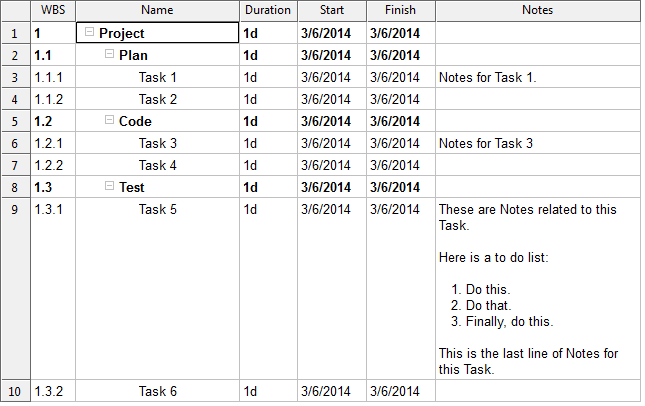
You can also enter Notes by doubleclicking a Task or by using the Task Sheet with the Notes field displayed as a column (as shown below).
Printing Notes
Notes can be printed by using the Task Sheet or by using the WBS Dictionary Export. Notes printed in the Task Sheet will even wrap to show the entire Note associated with that task.
Like this:
Notes and Microsoft Project
Microsoft Project contains a Notes field and WBS Schedule Pro can display the Notes entered in Microsoft Project. Any Notes entered in WBS Schedule Pro and then sent to Microsoft Project will be transferred.
Finally, if you have ever tried to print Notes from Microsoft Project then you know there are limits to this. Microsoft Project does not support multi-line Notes in a Sheet view and Exporting Notes from Microsoft Project may truncate the Note after the first line. The Task Sheet in WBS Schedule Pro supports multi-line Notes and the Export feature in WBS Schedule Pro does not truncate and includes all lines of the Note.